Greetings!
I apologize for the extended lapse of time that has past since I last posted. I have been spending time with family overseas, and I didn't have much time for posting.
It is great to be back!

For this post, we will be drawing a horse. Horses can be difficult to draw, so don't attempt this tutorial if you are just starting out drawing. Of course, you can if you want to! But this subject requires much practice with the basics of drawing; that is, perspective and composition and learning to sketch and to layout the subject, in particular drawing shapes and contours, and shading and blending.
Materials necessary for this Drawing Tutorial:
Pencils
Step 1

To start off, we will layout the horse on the paper with several circular
shapes. Use an HB grade pencil. Remember to go easy, and not be too heavy-handed with the pencil. Be sure to sketch in lines to define the angle of the horse, as shown in the above first step illustration.
As you can see from the illustration, the body of the horse is defined by sketching three elliptical circles conjoined together, with the back circle (representing the butt of the horse) penciled smaller, and the second (abdomen) slightly larger, and the third (front) ever more larger. We want to do this to define the proper perspective. The horse we are drawing is from the third-quarter perspective or viewpoint, which means that the viewer is looking at the horse from the side-front. This perspective technique is also referred to as foreshortening. The parts of the horse in the back will be smaller, and will taper the further back they go. The front of the horse will appear larger. Keep this mind, it is very important in achieving a realistic appearance of your subject in your drawing.
Step 2

In Step Two, we will start to add darker pencil strokes. Sketch in the mane and tail as shown, drawing just the outline of the hair. Around the outline of the horse, shade the dark areas in quickly. Don't try to add too much; we just want to define the basic contours of the horse's body. It is best to work slowly, gradually building the definitions by adding more graphite, and in turn, the dark to light values.
At the feet of the horse, quickly sketch in the outline of dust, as this horse. Just the barest of pencil marks is good enough at this point. We will define the dust in greater detail in subsequent steps.
Step 3


In the next step, we begin to develop the values with the 4B pencil, adding the darker tones to the horse. Also, we begin to define the contours of the muscles. Don't rub or blend what you are shading, that will be left for Step 5. Try to apply the graphite as evenly and as smoothly as possible. When we go in and blend, the result will be more smooth.
Step 5

For Step 5, we have added an overall darker tone, and have darkened the areas in shadow further. As you can notice from the above illustration for Step 5, our drawing at this point is a little flat, and without depth. This is because we haven't added the highlights with the eraser. That is where the drawing will really look outstanding! So don't be overly concerned with that now. We will be adding the highlights in Step 6.
With the 4B pencil, darken the areas of the horse with the deepest shadows first, then (not going too dark) give the horse an overall even coat of graphite, still using the 4B pencil.
Then take a tortillion (or tissue, or just use your finger) and blend the graphite into an even, smooth tone. If it looks like you have reduced the darker tones too much due to excess blending, no worries, just take an HB or 2B and touch it up.
Step 6
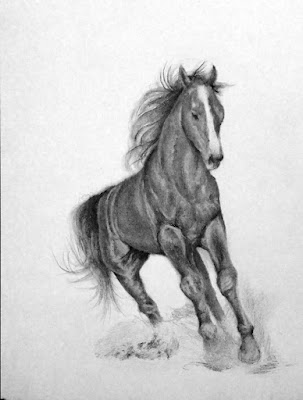
As you can see, the drawing is starting to take shape. What we are doing here is taking a kneaded eraser and erasing out the highlights. You can use a battery operated eraser, or a Pentel click eraser as well. You can also use a regular eraser for this, but I find a kneaded eraser is by far better to control, and not only that, the effects that you can get are quite remarkable.
As the light source is from the top-left side, the highlights on the horse are going to be added accordingly. Take the kneaded eraser and shape it to a point. Begin to highlight the muscles and body of the horse, always keeping in mind the light source is top-left. Do the same for the legs and face.
To make the highlights stand out further, go back over the darker areas with an HB or 2B pencil.
Now, it's on to Step 7, and we're almost finished!
Step 7

Now we'll sketch in the background using an HB pencil. Using the flat side of the pencil, sketch in the tree line in back of the horse. Pencil the shadows cast on the ground by the horse's fore hooves, and the hill line just below the tree line. Make sure that the background is fully covered; leave no space the bare white of the paper. Be sure to be mindful that the background will be lighter than the horse, as the back is further away. This will give depth to your drawing.
Step 8
In the last step, blend the background with a tissue, or just use a fingertip. Try to get a nice, soft blend; this will give it the look of distance and three-dimensionality.
Finally, erase out the clouds of dust with the kneaded eraser. If you have erased too much, no worries, just take the HB pencil and add a little more to it.
Thanks for looking!
I apologize for the extended lapse of time that has past since I last posted. I have been spending time with family overseas, and I didn't have much time for posting.
It is great to be back!

For this post, we will be drawing a horse. Horses can be difficult to draw, so don't attempt this tutorial if you are just starting out drawing. Of course, you can if you want to! But this subject requires much practice with the basics of drawing; that is, perspective and composition and learning to sketch and to layout the subject, in particular drawing shapes and contours, and shading and blending.
Materials necessary for this Drawing Tutorial:
Pencils
- HB
- 2B
- 4B
- Drawing Paper
- Tortillion, or tissue (for blending)
- Kneaded Eraser
- Eraser
- Pencil Sharpener
Step 1

shapes. Use an HB grade pencil. Remember to go easy, and not be too heavy-handed with the pencil. Be sure to sketch in lines to define the angle of the horse, as shown in the above first step illustration.
As you can see from the illustration, the body of the horse is defined by sketching three elliptical circles conjoined together, with the back circle (representing the butt of the horse) penciled smaller, and the second (abdomen) slightly larger, and the third (front) ever more larger. We want to do this to define the proper perspective. The horse we are drawing is from the third-quarter perspective or viewpoint, which means that the viewer is looking at the horse from the side-front. This perspective technique is also referred to as foreshortening. The parts of the horse in the back will be smaller, and will taper the further back they go. The front of the horse will appear larger. Keep this mind, it is very important in achieving a realistic appearance of your subject in your drawing.
Step 2

At the feet of the horse, quickly sketch in the outline of dust, as this horse. Just the barest of pencil marks is good enough at this point. We will define the dust in greater detail in subsequent steps.
Step 3

For Step Three, apply an even amount of medium-grade shading over the entire body of the horse. Not too dark, not too light; just a middle-ground shade. This is the first step to provide a foundation of shade and value pattern to the drawing, and in fact, it is the method that I utilize with all drawings. It is good to form a habit of doing it this way. Just lay down an even shade; don't worry too much about the dark and light areas, those you can do later. I find this method gives the drawing a more life-like and realistic look. It doesn't look like much at this step, but by the time you are finishing the drawing, it will really come to life.
After applying the even shading, quickly pencil in a darker shade where the mane and tail meet the head and body of the horse, sketching a bit darker than the even shading. No need to detail the mane and tail, we are just applying the basic shadow.
Lastly, apply an even shade at the horse's feet. The briefly pencil in some of the shadow areas as shown in the above illustration, giving the slight impression of the dust being kicked. Again, don't give it too much detail, just the faintest impression.
Step 4

Step 5

For Step 5, we have added an overall darker tone, and have darkened the areas in shadow further. As you can notice from the above illustration for Step 5, our drawing at this point is a little flat, and without depth. This is because we haven't added the highlights with the eraser. That is where the drawing will really look outstanding! So don't be overly concerned with that now. We will be adding the highlights in Step 6.
With the 4B pencil, darken the areas of the horse with the deepest shadows first, then (not going too dark) give the horse an overall even coat of graphite, still using the 4B pencil.
Then take a tortillion (or tissue, or just use your finger) and blend the graphite into an even, smooth tone. If it looks like you have reduced the darker tones too much due to excess blending, no worries, just take an HB or 2B and touch it up.
Step 6

As you can see, the drawing is starting to take shape. What we are doing here is taking a kneaded eraser and erasing out the highlights. You can use a battery operated eraser, or a Pentel click eraser as well. You can also use a regular eraser for this, but I find a kneaded eraser is by far better to control, and not only that, the effects that you can get are quite remarkable.
As the light source is from the top-left side, the highlights on the horse are going to be added accordingly. Take the kneaded eraser and shape it to a point. Begin to highlight the muscles and body of the horse, always keeping in mind the light source is top-left. Do the same for the legs and face.
To make the highlights stand out further, go back over the darker areas with an HB or 2B pencil.
Now, it's on to Step 7, and we're almost finished!
Step 7

Now we'll sketch in the background using an HB pencil. Using the flat side of the pencil, sketch in the tree line in back of the horse. Pencil the shadows cast on the ground by the horse's fore hooves, and the hill line just below the tree line. Make sure that the background is fully covered; leave no space the bare white of the paper. Be sure to be mindful that the background will be lighter than the horse, as the back is further away. This will give depth to your drawing.
Step 8
In the last step, blend the background with a tissue, or just use a fingertip. Try to get a nice, soft blend; this will give it the look of distance and three-dimensionality.
Finally, erase out the clouds of dust with the kneaded eraser. If you have erased too much, no worries, just take the HB pencil and add a little more to it.
Thanks for looking!
ReplyDeleteJaycees Horses For Healing
INTERESTED IN VOLUNTEERING AT JAYCEE’S HORSES FOR HEALING?
WE WILL HAVE PLENTY OF OPPORTUNITIES FOR ANYONE LOOKING TO DONATE THEIR TIME AND TALENT.